BDD: From the idea to the App 2
It’s been almost two years since I wrote my post from the idea to the App, and that’s a long time. Since then many things changed and I’ve been working a lot on BDD and TDD. So I guess this is a great moment to start a new series of posts about how to do the full process.
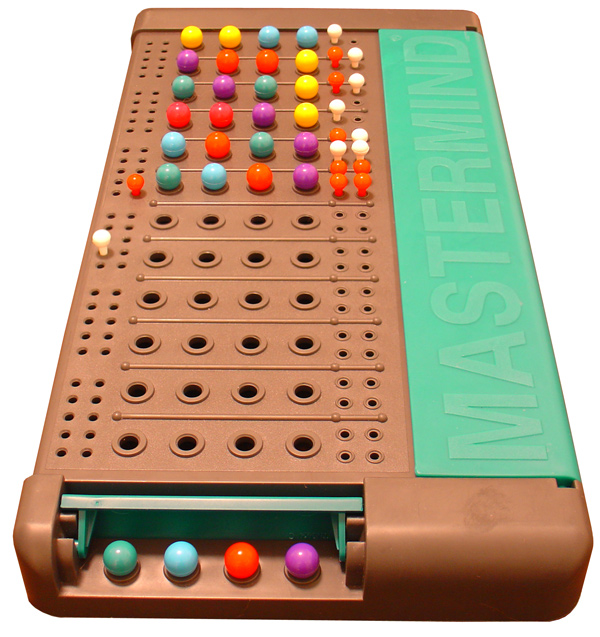
Last year I did a formation on iOS development. The final lessons consisted in creating a game, the Mastermind game. I think it is a good idea to use this example to build and app using TDD and BDD. Of course this process will not contain the full creation process with all details as it would take ages, even a book to do it, but I will include the headlines of the process with all the details and guides to complete the process, and of course with the code to do it.
Let’s start with it.
Introduction
We want to create the classic mastermind game. For those that doesn’t know how top play Mastermind can take a look at wikipedia where the rules are very well explained.

In order to make this easier, let’s simplify some rules. We’ll make a fix number of games to play, let’s say nine, the codemaker will always be the iPhone and finally, there will be no points distribution, if the codebreaker guesses the pattern of colors before ten games, wins, otherwise loses.
Of course those restrictions can be released in the future, but for now, let’s do it this way.
What do you need to start and App

The first job to be done is far from the keyboard. We all want to start typing and working with the mac and seeing how it is starting to look like we expect to see it, but the truth is that The better you prepare it all, the best result you’ll get.
So now let’s put our Product Owner hat on and let’s draw what we want. In this case, as we are going to create a game, we can start with the graphical part, because it will drive most of the subsequent user stories.
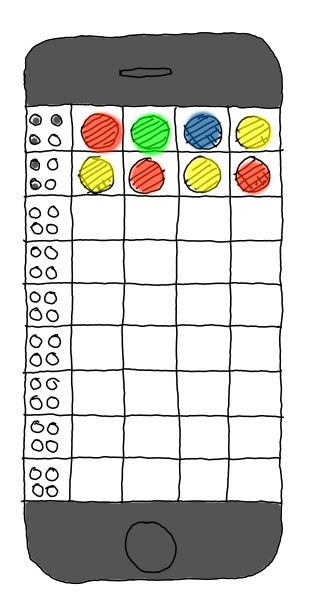
Drawn on paper it could look like something like this. I like to draw my first version with a pen or pencil so I can make easy and fast corrections as many times as I want. Once I am happy with the result, I will be able to proceed with more sophisticated tools or even ask a graphical designer to make a nice version of what I have on my mind to look as nicer as possible. But remember, one step at a time and don’t try starting to build your house by the roof.
The sketch contains all the information we need. It has a place to put the combinations. It has a place to show the result of the try. And it has enough space to repeat each try until the user gas the combination or consumes all the opportunities.
Easy right? Well now you can say you have not only an idea but also what it should look like. Next step is start with the analysis of what we’ve just drawn.
First task, Analise what have we got to work with

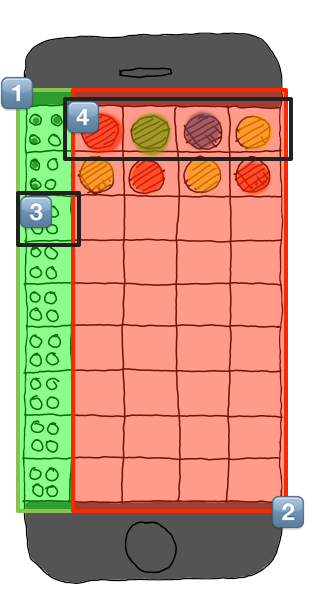
First thing we can identify is that there are four different zones that we can identify.
1 - Left column is different from the rest. It will contain the results of the last combination we played.
2 - Four columns at the right of the first column. They will contain each of the combination we’ve tried in chronological order.
3 - Cell content with a special control that contains the result of the combination composed by the four colors at its right.
4 - Row contents with four cells, each with a color representing a combination.
I know this analysis might seem too basic and simplistic, but believe me, simple analysis lead to simple and effective solutions and makes you not missing any part of your project. In fact engineering is that, dividing problems in smaller problems and those in more smaller until we are able to find a solution for each one and then reintegrate them in one big solution.
And that’s all for this post. In the next post BDD - Mastermind : Internal Design we’ll start writing the requirements for the graphic part so we can be able to transform them into scenarios we can test in our continuous integration system.
Please, don’t forget to share this post if you liked it.